
Carbon fiber exhaust tips add an exposed-carbon detail at the rear of a vehicle without replacing the complete exhaust system. Their fitment is less universal than the product photographs suggest. Inlet diameter, outlet diameter, overall length, tailpipe angle, mounting method, heat isolation and bumper clearance must work together. A tip that is visually attractive but incorrectly sized can sit crooked, rattle, overheat nearby trim or fail to clamp securely.
Carbon fiber exhaust tips: the quick answer
Measure the existing tailpipe outside diameter and available length on the vehicle. Match those values to the tip’s inlet inside diameter, clamping range and total length. Choose a design with a suitable metal inner tube and controlled separation from the carbon sleeve. Confirm clamp, bolt-on or weld-on installation, allow for exhaust movement and heat, and do not expect a decorative tip alone to create meaningful horsepower.

What is a carbon fiber exhaust tip?
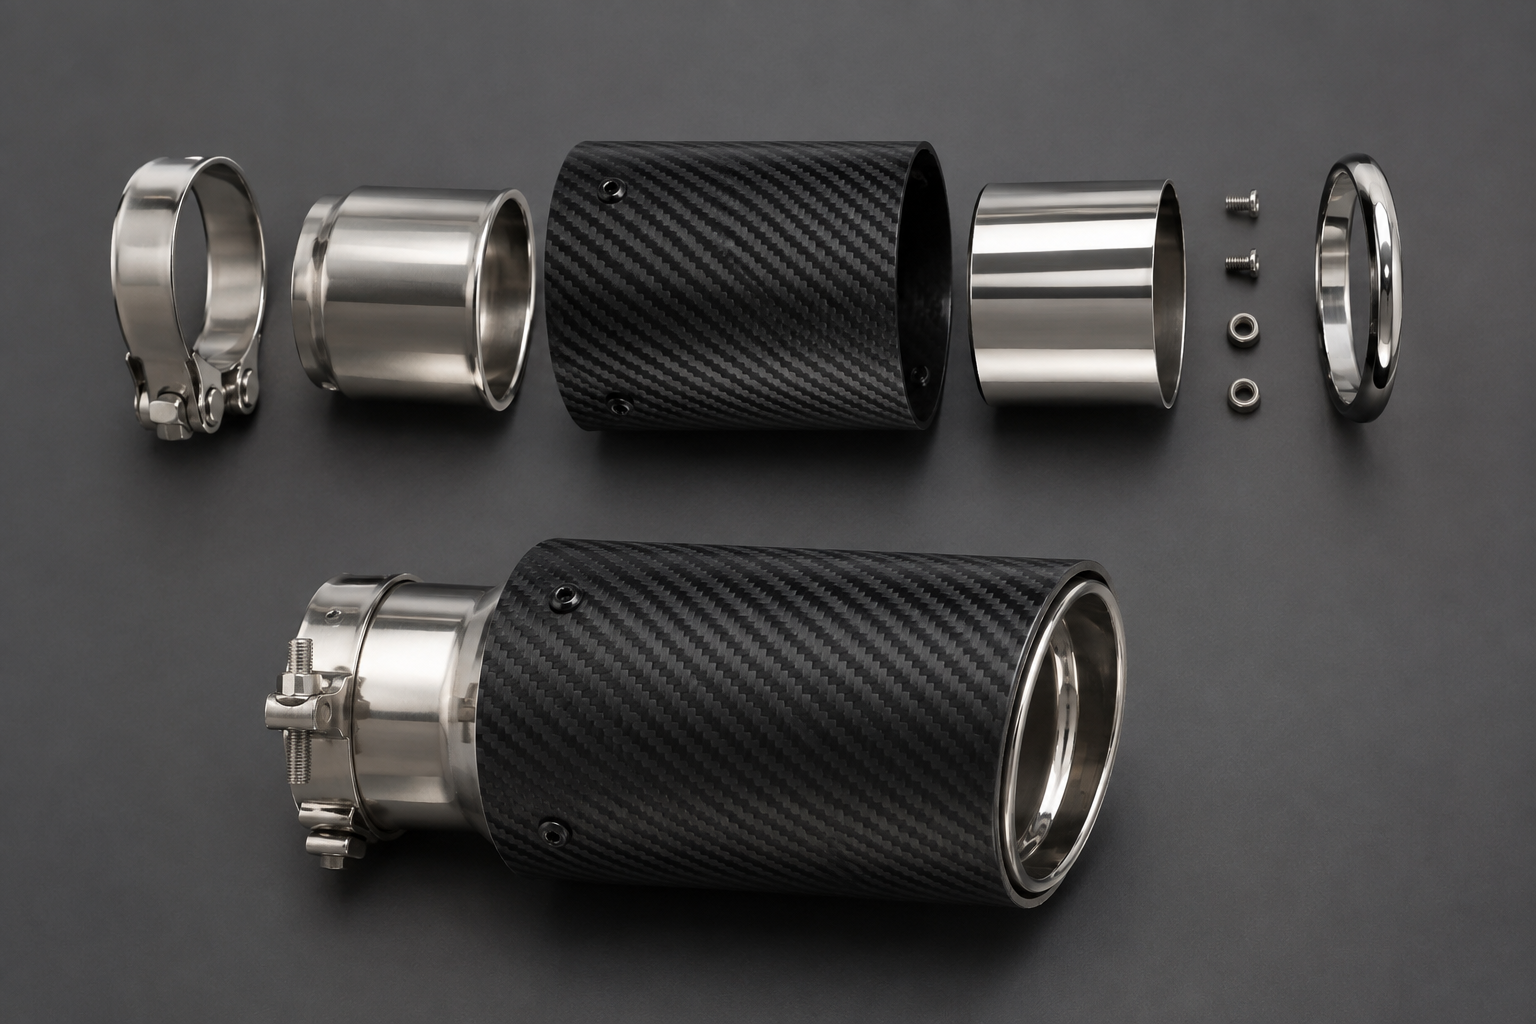
Most road-oriented carbon exhaust tips combine a stainless steel inner flow path with a carbon fiber outer sleeve. The metal tube handles direct exhaust gas and provides the mounting interface; the carbon sleeve supplies the exposed weave and external shape. Spacers, fasteners or an air gap may separate the materials and help control heat transfer.
A product described as “carbon fiber” may use a real woven sleeve, forged-carbon appearance, a carbon skin over another shell or only a printed pattern. Ask for a construction diagram or clear inlet photograph. The carbon should not be treated as the primary hot-gas tube unless the manufacturer specifically engineered and documented it for that purpose.
The 7 checks to make before you buy
1. Measure the tailpipe outside diameter
The most important value is the outside diameter of the pipe that will enter the tip. Measure the clean, round section where the clamp or adapter will sit—not only the visible factory outlet. Measure at more than one angle because a used pipe may be slightly oval.
Compare this with the tip’s inlet inside diameter and stated clamping range. A tip that is much larger may need a proper reducer sleeve; a tip that is smaller will not fit without cutting or replacing pipework. Do not assume that a “3-inch tip” has a 3-inch inlet: listings often use the outlet diameter in the product name.
2. Separate inlet, outlet and overall length
| Dimension | What it controls | Common mistake |
|---|---|---|
| Inlet inside diameter | Fit over or onto the existing tailpipe | Confusing it with the larger visible outlet |
| Outlet outside diameter | Visual fill and diffuser-opening clearance | Choosing by appearance without checking space |
| Overall length | Projection from the bumper and clamp position | Ignoring bends or short straight pipe sections |
| Inlet engagement length | Area available for a secure clamp or weld | Clamping on a taper, seam or curved section |
Make a simple side-view sketch of the bumper edge, diffuser opening and tailpipe end. Record how far the new outlet may project while remaining visually balanced and safely clear of surrounding parts.
3. Inspect the metal liner and heat isolation
The inner tube should be continuous, properly finished and made from a material suitable for exhaust exposure. Ask for the stainless grade when it matters to the application. Inspect how the carbon sleeve is supported, whether hot metal directly contacts the laminate, and whether fasteners allow for different rates of thermal expansion.
Carbon fiber itself tolerates heat differently from the resin and clearcoat around it. Discoloration, clouding or delamination can begin in the resin system even when the fibers remain intact. A believable supplier should state operating limits and installation clearances rather than claim that every carbon tip is “heatproof.”

4. Choose the correct mounting method
Clamp-on tips can be adjustable and removable when the inlet and pipe sizes match. The clamp needs enough straight engagement and access for tightening. Bolt-on tips may use set screws or an integrated clamp; contact points should not distort the pipe. Weld-on tips offer a permanent metal-to-metal connection but require a qualified exhaust fabricator and a design that keeps welding heat away from the carbon sleeve.
Never weld directly against an assembled carbon section unless the manufacturer’s procedure specifically allows it. Remove or protect heat-sensitive components as instructed. After installation, every tip should be retained independently and should not rely on contact with the diffuser to hold its position.
5. Check bumper, diffuser and body clearance
Exhaust systems move as the engine loads, the vehicle travels over bumps and hot components expand. A tip that appears clear while the car is cold and stationary may contact a diffuser during use. Check clearance around the full outlet perimeter, behind the visible opening and along the carbon sleeve.
Compare both sides on dual or quad layouts. Projection, height, angle and left-to-right spacing should be symmetrical. A professional installer can loosen upstream joints and align the system before tightening the new tips instead of forcing one outlet into position.
6. Select shape, weave and finish as a complete set
Round, oval, slash-cut and angle-cut outlets create different visual weight. Larger is not automatically better: an oversized outlet can make factory diffuser openings look crowded and may reduce clearance. On a pair or set of four, ask the supplier to match carbon weave direction, gloss level, outlet edge and total length.
Inspect the sleeve for straight weave, sealed edges, even clearcoat and clean fastener positions. A forged-carbon surface should have a non-repeating marbled pattern; a woven twill should appear consistent without obvious printed repetition. If the car uses other exposed carbon parts, specify the target weave and sheen.
7. Keep sound and performance expectations realistic
A decorative exhaust tip mainly changes appearance. Outlet shape can slightly change the tone perceived close to the exit, but a tip alone does not normally deliver a meaningful power increase. Engine sound and flow are governed far more by the rest of the exhaust system, including pipe diameter, catalysts, resonators, mufflers and routing.
Be cautious with listings that promise large horsepower gains or a guaranteed sound change from a clamp-on tip. If performance is the goal, evaluate the complete system and any required calibration. RevexaAuto’s exhaust systems and tips collection provides a broader starting point for application-specific sourcing.
Installation checklist for carbon exhaust tips
- Allow the complete exhaust to cool before measuring or working.
- Raise and support the vehicle using approved equipment when underbody access is required.
- Clean and inspect the tailpipe for corrosion, cracks, ovality and weak metal.
- Dry-fit the tip, mark engagement depth and verify clamp access.
- Set projection and clearance on a cold vehicle without forcing the exhaust hangers.
- Tighten the mounting hardware to the supplied procedure, then compare all outlets.
- After an initial heat cycle and cool-down, inspect the clamp, alignment and surrounding trim again.
Professional installation is recommended if pipe cutting, welding, reducers, diffuser adjustment or under-vehicle work is involved. Exhaust components can remain dangerously hot after driving, and an incorrectly supported vehicle creates serious risk.
How to clean and maintain carbon fiber exhaust tips
Exhaust soot is easier to remove before it hardens. With the system completely cool, wash the carbon sleeve using automotive-safe shampoo and a soft microfiber towel. Clean the metal inner outlet with a product approved for that finish, keeping aggressive metal polish away from the carbon clearcoat. Do not use wire wool or harsh abrasives on the laminate.
Inspect the clearcoat, sleeve fasteners and clamp periodically. A yellowed, cloudy or blistered surface may indicate heat exposure or coating damage. Stop and investigate if the tip becomes loose, changes angle, contacts the diffuser or develops a rattle.
Carbon fiber exhaust tips FAQ
Do carbon fiber exhaust tips change the sound?
They may create a small perceived difference at the outlet, but substantial sound changes normally require changes to the muffler, resonator, pipework or other system components.
Will a carbon fiber exhaust tip melt?
The risk depends on the resin, clearcoat, inner liner, spacing, exhaust temperature and installation. Choose a documented product with a metal liner and follow its heat and clearance requirements.
Can I fit a 5-inch outlet to a smaller pipe?
Possibly, if the tip has the correct inlet or uses an engineered reducer and there is enough space around the outlet. The advertised 5-inch dimension often describes the outlet, not the inlet.
Are clamp-on exhaust tips secure?
They can be when the size range, engagement length, pipe condition and clamp design are correct. Reinspect the connection after the first heat cycle and during routine maintenance.
Request a quote with all four key dimensions
Send the vehicle, existing tailpipe outside diameter, desired outlet diameter, available length, preferred projection, number of tips, mounting method, weave, finish and delivery country. Include straight-on and side photographs with a ruler in view. For more context on material descriptions, read our carbon fiber vs fiberglass car parts guide. Ask RevexaAuto to review your exhaust-tip specification before ordering.
Reviewed by the RevexaAuto Technical Team. Exhaust layouts and temperatures vary. Confirm the product’s operating limits and use a qualified installer when cutting, welding or under-vehicle work is required.